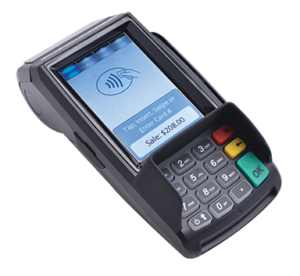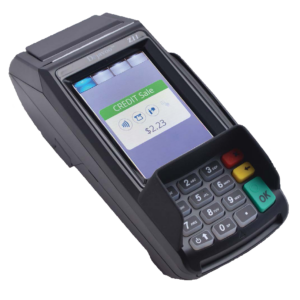

DEJAVOO Z9/Z11
EMV Quick Reference Guide: Retail/Restaurant
These steps have been provided as a guide for assistance with your Dejavoo touch screen payment device with AURA software.
IMPORTANT: The terminal’s idle prompt displays a selection of payment type icons. The STAR icon will take you to your favorites menu, the THREE HORIZONTAL LINES icon will take you to the terminal’s Services menu and when configured, use the PHONE icon for a CALL ME request.
CHIP CREDIT SALE
- Tap on the CREDIT icon on your terminal home screen.
- Tap on the SALE icon.
- Input SERVER # and press OK. Conditional on the terminal’s configuration. Restaurant only.
- Input the SALE AMOUNT and press OK.
- Tap (contactless only) or insert chip card.
- If prompted, confirm the sale amount by tapping YES or NO.
- The transaction is processed. Sales receipts will print with details of the transaction.
*Conditional on the terminal’s configuration.
DEBIT SALE
*Conditional on the terminal’s configuration.
- Tap on the DEBIT icon on your terminal home screen.
- Tap on the SALE icon.
- Input SERVER # and press OK. Conditional on the terminal’s configuration. Restaurant only.
- Input the sale amount and press OK.
- Tap (contactless only), swipe or insert chip card.
- If prompted, confirm the sale amount by tapping YES or NO
- Cardholder inputs PIN on terminal PIN Pad or external PIN Pad and presses OK.
- The transaction is processed. Sales receipts will print with details of the transaction.
CREDIT CARD RETURN
- Tap on the CREDIT icon on your terminal home screen.
- Tap on the RETURN icon.
- Input SERVER # and press OK. Conditional on the terminal’s configuration. Restaurant only.
- Input the RETURN AMOUNT and press OK.
- Tap (contactless only), swipe, insert chip card or manually enter card #.
- If prompted, confirm the sale amount by tapping YES or NO.
- The transaction is processed. Sales receipts will print with details of the transaction.
*Conditional on the terminal’s configuration.
- Tap on the CREDIT icon on your terminal home screen.
- Tap on the SALE icon.
- Input SERVER # and press OK. Conditional on the terminal’s configuration. Restaurant only.
- Input the sale amount and press OK.
- Manually input card #.
- Follow the CNP prompts (input exp. date, ZIP code etc).
- The transaction is processed. Sales receipts will print with details of the transaction.
*Conditional on the terminal’s configuration.
VOID CREDIT TRANSACTION (CARD PRESENT)
- Tap on the CREDIT icon on your terminal home screen.
- Tap on the VOID icon.
- Input SERVER # and press OK. Conditional on the terminal’s configuration. Restaurant only.
- Input the VOID amount and press OK.
- If prompted, confirm the void amount by tapping OK or CANCEL.
- If prompted, input Manager Password (1234 default).
- Tap (contactless only) or insert chip card.
- The transaction is processed. Void receipts will print with details of the transaction.
*Conditional on the terminal’s configuration.
ENABLED ONLY FOR RESTAURANTS APPLICATIONS
- From the idle prompt, tap the STAR icon to access the FAVORITES menu.
- Tap VOID TRANSACTION.
- If prompted, input Manager Password (1234 default).
- Tap BY TRANSACTION #.
- Input TRANSACTION # to be voided and press OK.
- Confirm the void transaction by tapping SELECT.
- If prompted, confirm the void amount by tapping OK or CANCEL.
- If prompted, input Manager Password (1234 default).
- The void is processed. Void receipts will print with details of the transaction.
*Conditional on the terminal’s configuration.
REPRINT RECEIPT
- From the idle prompt, tap the STAR to access the FAVORITES menu.
- Tap REPRINT RECEIPT.
- If prompted, input Manager Password (1234 default).
- Tap desired option (LAST, BY TRANSACTION # or BY CARD NUMBER).
- Follow prompts and transaction receipt prints.
EDIT TIPS BY TRANSACTION NUMBER
ENABLED ONLY FOR RESTAURANTS APPLICATIONS
- From the idle prompt, tap the STAR icon to access the FAVORITES menu.
- Tap EDIT TIP.
- If prompted, input Manager Password (1234 default).
- Tap ALL.
- Tap TRANSACTION #.
- Transaction amount appears, input TIP AMOUNT and press OK.
- If prompted, confirm the tip amount by tapping YES or NO.
- Repeat steps 5 and 6 as needed.
- Press the RED X X key after all desired tips have been adjusted.
*Conditional on the terminal’s configuration.
Powering on (Z9 only)
- Press POWER key to turn on terminal.
- Powering off (Z9 only)
- Tap the STAR icon to access the FAVORITES menu.
- Tap on POWER OFF to turn off terminal.
To power cycle all terminals.
Press POWER key to turn on terminal.

Wi-Fi icon will blink when not connected.
It will remain static when connected successfully.
- Tap the WIFI icon to access the NETWORK screen.
- Tap WIFI and look for your network.
- If prompted, input Manager Password (1234 default).
- Tap CONNECT.
- Once you are connected you should see an IP address.
SETTLE DAILY BATCH
- From the idle prompt, tap the STAR ICON to access the FAVORITES menu.
- Tap SETTLE DAILY BATCH.
- If prompted, input Manager Password (1234 default).
- Settlement Report prints.
- Terminal communicates with the host.
PRINTING REPORTS
- From the idle prompt, tap the STAR icon to access the FAVORITES menu.
- Tap desired report type (DAILY REPORT or SUMMARY REPORT).
- If prompted, input Manager Password (1234 default).
- REPORT prints.
- From the idle prompt, tap the THREE HORIZONTAL LINES icon to access the SERVICES menu.
- Tap CORE
- Tap APPLICATIONS.
- Tap CREDIT/DEBIT/EBT.
- Tap SETUP.
- If prompted, input Manager Password (1234 default).
- Tap TRANS PROMPTS.
- Tap CLERKS.
- Tap PROMPT.
- Tap to select desired option and press OK.
- To return to the home screen press the RED XX key 2 times.

GPRS signal
strength indicator
(the more bars, the
better your signal GPRS).

Battery strength indicator.

Indicates issue with SIM card (gprs).

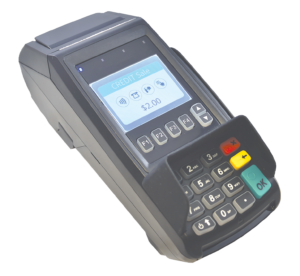
DEJAVOO Z8
EMV Quick Reference Guide Retail/Restaurant
These steps have been provided as a guide for assistance with your Dejavoo non-touch screen payment device with AURA software.
IMPORTANT: The terminal’s idle prompt displays CREDIT and SALE options and a prompt to access the SERVICES menu (F1). To change payment type, use the down arrow key to select the payment type your prefer. To change transaction type, press the YELLOW BACK key until the transaction type you prefer appears.
CHIP CREDIT SALE
- From your terminal home screen, input SERVER # and press OK. (Restaurant only. )*
- Input the Sale Amount and press OK.
- Tap (contactless only) or insert chip card.
- If prompted, confirm the sale amount by pressing F2 (YES) or F4 (NO).*
- The transaction is processed. Sales receipts will print with details of the transaction
*Conditional on the terminal’s configuration.
DEBIT SALE
- Use the down arrow key to highlight DEBIT on your terminal home screen and press OK.
- Press OK key to select SALE or input SERVER # and press OK (Restaurant only). *
- Input the sale amount and press OK.
- Tap (contactless only), swipe or insert chip card.
- If prompted, confirm the sale amount by pressing F2 (YES) or F4 (NO). *
- Cardholder inputs PIN on terminal PIN Pad or external PIN Pad and presses OK.
- The transaction is processed. Sales receipts will print with details of the transaction.
*Conditional on the terminal’s configuration.
CREDIT CARD RETURN
- From your terminal home screen, press the YELLOW BACK key until RETURN appears.
- Input the RETURN amount and press OK.
- Confirm the return amount by pressing F2 (YES) or F4 (CANCEL).
- If prompted input Manager Password (1234 default).
- Tap (contactless only), insert, swipe or manually enter card #.
- The transaction is processed. Return receipts will print with details of the transaction.
MANUALLY ENTERED CREDIT SALE
- From your terminal home screen, input SERVER # and press OK. Conditional on the terminal’s configuration. Restaurant only.
- Input the Sale Amount and press OK.
- Manually input card #.
- Follow the CNP prompts (input exp. date, ZIP code etc). *
- The transaction is processed. Sales receipts will print with details of the transaction.
*Conditional on the terminal’s configuration.
VOID CREDIT TRANSACTION (CARD PRESENT)
- From the idle prompt, press F1 or STAR icon to access the SERVICES/FAVORTIES menu.
- Use the UP and DOWN arrow keys to highlight FAVORITES and press OK.
- Use the UP and DOWN arrow keys to highlight VOID TRANSACTION and press OK.
- If prompted, input Manager Password (1234 default).
- Use the UP and DOWN arrow keys to select BY TRANSACTION # and press OK.
- Input transaction # to be voided and press OK.
- If prompted, confirm the VOID amount by pressing F2 (YES) or F4 (NO).*
- If prompted, input Manager Password (1234 default).
- The void is processed. Void receipts will print with details of the transaction.
VOID CREDIT TRANSACTION (CARD NOT PRESENT)
- From the idle prompt, press F1 to access the SERVICES menu.
- Use the UP and DOWN arrow keys to highlight FAVORITES and press OK.
- Use the UP and DOWN arrow keys to highlight VOID CR/DB TRANS and press OK.
- If prompted, input Manager Password (1234 default).
- Use the UP and DOWN arrow keys to select BY TRANSACTION # and press OK.
- Input transaction # to be voided and press OK.
- If prompted, confirm the VOID amount by pressing F2 (YES) or F4 (NO).*
- If prompted, input Manager Password (1234 default).
- The void is processed. Void receipts will print with details of the transaction.
*Conditional on the terminal’s configuration.
REPRINT RECEIPT
- From the idle prompt, press F1 or STAR icon to access the SERVICES/FAVORITES menu.
- Use the UP and DOWN arrow keys to highlight FAVORITES and press OK.
- Use the UP and DOWN arrow keys to highlight REPRINT CR/DB RECEIPT and press OK.
- If prompted, input Manager Password (1234 default).
- Use the UP and DOWN arrow keys to highlight desired option (LAST, BY TRANSACTION # or BY CARD NUMBER) and press OK.
- Transaction receipt prints.
PRINTING REPORTS
- From the idle prompt, press F1 or THREE HORIZONTAL LINES icon to access the SERVICES menu.
- Use the UP and DOWN arrow keys to highlight REPORTS and press OK.
- Use the UP and DOWN arrow keys to highlight desired report type (DAILY REPORT or SUMMARY REPORT) and press OK.
- If prompted, input Manager Password (1234 default).
- REPORT prints.
EDIT TIPS BY TRANSACTION #
- From the idle prompt, press F1 or STAR icon to access the SERVICES/FAVORITES menu.
- Use the UP and DOWN arrow keys to highlight FAVORITES and press OK.
- Use the UP and DOWN arrow keys to highlight EDIT ALL TRANS # and press OK.
- Input TRANSACTION # and press OK.
- Transaction will display, enter TIP AMOUNT and press OK.
- Repeat steps 3 and 4 as needed.
- Press the RED X X key after all desired tips have been adjusted.
WI-FI ICON INDICATOR (FOR WI-FI ENABLED UNITS)
ENABLED ONLY FOR RESTAURANTS APPLICATION

Wi-Fi connected successfully.
SETTLE DAILY BATCH
- From the idle prompt, press F1 to access the SERVICES menu.
- Highlight FAVORITES and press OK.
- Use the UP and DOWN arrow keys to highlight SETTLEMENT and press OK.
- Use the UP and DOWN arrow keys to highlight SETTLE DAILY BATCH and press OK.
- If prompted, input Manager Password (1234 default).
- Terminal communicates with the host.
- Settlement report prints.
TURN SERVER/CLERK PROMPT ON/OFF
- From the idle prompt, press F1 to access the SERVICES menu.
- Use the UP and DOWN arrow keys to highlight CORE and press OK.
- Use the UP and DOWN arrow keys to highlight APPLICATIONS and press OK.
- Use the UP and DOWN arrow keys to highlight CREDIT/DEBIT/EBT and press OK.
- Use the UP and DOWN arrow keys to highlight SETUP and press OK.
- If prompted, input Manager Password (1234 default).
- Use the UP and DOWN arrow keys to highlight TRANS PROMPTS and press OK.
- Press OK to select CLERKS.
- Press OK to select PROMPT.
- Use the UP and DOWN arrow keys to highlight desired option and press OK.
- To return to the home screen press the RED X X key 3 times.
POWER CYCLE TERMINAL
- Press and hold the POWER key on the keyboard and release once terminal starts to reboot.
Z LINE DEJAVOO CASH DISCOUNT APPLICATION
CHIP CREDIT SALE
- From your terminal home screen, input SERVER # and press OK. (Restaurant only. )*
- Input the Sale Amount and press OK.
- Select how the merchant is paying Card or Cash.
- Tap (contactless only) or insert chip card.
- If prompted, confirm the sale amount by pressing F2 (YES) or F4 (NO).*
- The transaction is processed. Sales receipts will print with details of the transaction
*Conditional on the terminal’s configuration.
MANUALLY ENTERED CREDIT SALE
- From your terminal home screen, input SERVER # and press OK. Conditional on the terminal’s configuration. Restaurant only.
- Input the Sale Amount and press OK.
- Select how the merchant is paying Card or Cash.
- Manually input card #.
- Follow the CNP prompts (input exp. date, ZIP code etc). *
- The transaction is processed. Sales receipts will print with details of the transaction.
*Conditional on the terminal’s configuration.
DEBIT SALE
- Input the Sale Amount and press OK.
- Select how the merchant is paying CARD or CASH.
- Press OK key to select SALE or input SERVER # and press OK (Restaurant only). *
- Select Payment Type CREDIT or DEBIT
- Use the down arrow key to highlight DEBIT on your terminal screen and press OK.
- Tap (contactless only), swipe or insert chip card.
- Cardholder inputs PIN on terminal PIN Pad or external PIN Pad and presses OK.
- The transaction is processed. Sales receipts will print with details of the transaction.
CREDIT CARD RETURN
- From your terminal home screen, Input the RETURN amount and press OK.
- Select F2 (FORWARD) or F3 (BACKWARDS) to find the RETURN option.
- Once RETURN is displayed at top of screen press OK
- Press OK to bypass Ref #.
- Enter the RETURN amount, if $0.00 is displayed.
- If prompted input Manager Password (1234 default).
- Tap (contactless only), insert, swipe or manually enter card #.
- The transaction is processed. Return receipts will print with details of the transaction.
VOID CREDIT TRANSACTION
- From the idle prompt, press F1 or STAR icon to access the SERVICES/FAVORTIES menu.
- Use the UP and DOWN arrow keys to highlight FAVORITES and press OK.
- Use the UP and DOWN arrow keys to highlight VOID TRANSACTION and press OK.
- If prompted, input Manager Password (1234 default).
- Use the UP and DOWN arrow keys to select BY TRANSACTION # and press OK.
- Input transaction # to be voided and press OK.
- If prompted, confirm the VOID amount by pressing F2 (YES) or F4 (NO).*
- If prompted, input Manager Password (1234 default).
- The void is processed. Void receipts will print with details of the transaction.
REPRINT RECEIPT
- From the idle prompt, press F1 or STAR icon to access the SERVICES/FAVORITES menu.
- Use the UP and DOWN arrow keys to highlight FAVORITES and press OK.
- Use the UP and DOWN arrow keys to highlight REPRINT CR/DB RECEIPT and press OK.
- If prompted, input Manager Password (1234 default).
- Use the UP and DOWN arrow keys to highlight desired option (LAST, BY TRANSACTION # or BY CARD NUMBER) and press OK.
- Transaction receipt prints.
PRINTING REPORTS
- From the idle prompt, press F1 or THREE HORIZONTAL LINES icon to access the SERVICES menu.
- Use the UP and DOWN arrow keys to highlight REPORTS and press OK.
- Use the UP and DOWN arrow keys to highlight desired report type (DAILY REPORT or SUMMARY REPORT) and press OK.
- If prompted, input Manager Password (1234 default).
- REPORT prints.
EDIT TIPS BY TRANSACTION #
- From the idle prompt, press F1 or STAR icon to access the SERVICES/FAVORITES menu.
- Use the UP and DOWN arrow keys to highlight FAVORITES and press OK.
- Use the UP and DOWN arrow keys to highlight EDIT ALL TRANS # and press OK.
- Input TRANSACTION # and press OK.
- Transaction will display, enter TIP AMOUNT and press OK.
- Repeat steps 3 and 4 as needed.
- Press the RED X X key after all desired tips have been adjusted.
WI-FI ICON INDICATOR (FOR WI-FI ENABLED UNITS)
ENABLED ONLY FOR RESTAURANTS APPLICATION

Wi-Fi connected successfully.
SETTLE DAILY BATCH
- From the idle prompt, press F1 to access the SERVICES menu.
- Highlight FAVORITES and press OK.
- Use the UP and DOWN arrow keys to highlight SETTLEMENT and press OK.
- Use the UP and DOWN arrow keys to highlight SETTLE DAILY BATCH and press OK.
- If prompted, input Manager Password (1234 default).
- Terminal communicates with the host.
- Settlement report prints.
TURN SERVER/CLERK PROMPT ON/OFF
- From the idle prompt, press F1 to access the SERVICES menu.
- Use the UP and DOWN arrow keys to highlight CORE and press OK.
- Use the UP and DOWN arrow keys to highlight APPLICATIONS and press OK.
- Use the UP and DOWN arrow keys to highlight CREDIT/DEBIT/EBT and press OK.
- Use the UP and DOWN arrow keys to highlight SETUP and press OK.
- If prompted, input Manager Password (1234 default).
- Use the UP and DOWN arrow keys to highlight TRANS PROMPTS and press OK.
- Press OK to select CLERKS.
- Press OK to select PROMPT.
- Use the UP and DOWN arrow keys to highlight desired option and press OK.
- To return to the home screen press the RED X X key 3 times.
